AWS AMI Snapshotter
What is it?
This terraform project will execute given script on AWS EC2 (installation here) and take AMI snapshot of it so that future EC2 can be spun up from that AMI, without the burden of running initial installation. Terraform destroy subcommand will purposefully NOT destroy the AMI, but will destroy the original EC2 and associated resources.
Code available on BitBucket.
Why?
Lately I have been provisioning a number of instances which required a significantly large package to be downloaded and installed on them. I had a reason not to use Configuration Management solution so I chose to install these packages during initial provisioning. The process of download and installation alone was taking over 10 minutes per instance and I wanted to reduce this time. This repo allowed me to save about 9 minutes on the process of installing generic software. I only had to apply sensitive and specific configuration on top of the pre-installed package.
Warning about costs
Creating resources with your cloud provider will normally incur cost for you.
The EC2 used for the installation process is beefier than what I need to run the installed software, to speed the installation up. Once AMI is created I can spin up lighter boxes to run it.
You may already know that terraform destroy subcommand attempts to destroy resources you've created with it.
In order to make AMI long-lived I had to create the AMI outside of Terraform state (look at './scripts/snapshot.sh').
It means that destroying resources with Terraform will not remove the AMIs and associated Snapshots.
Once you don't have a need for an AMI remove it and its Snapshot manually (via web console or AWS CLI).
As an example, if you run 10 successful cycles of apply and destroy subcommands against this repo, at the end of that run you will have 10 new AMIs and 10 new snapshots, each of which costs you money!
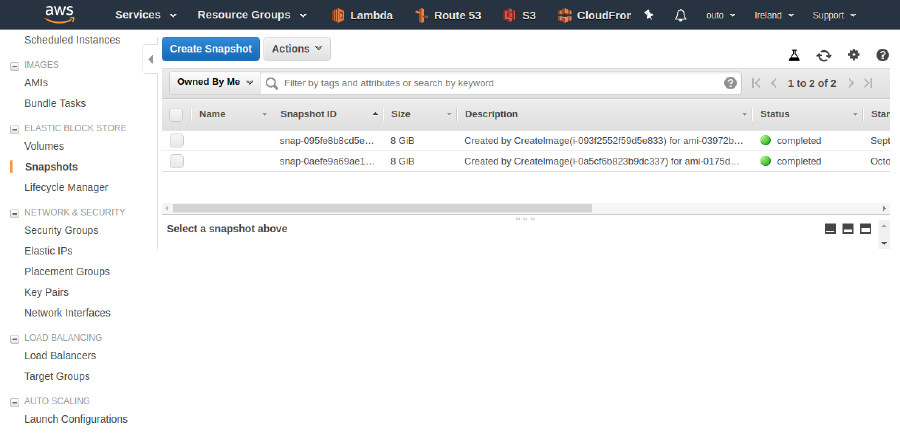
Both, AMIs and snapshots, can be removed from within web console. Navigate to EC2 service and select IMAGES -> AMIs or ELASTIC BLOCK STORE -> Snapshots.
Print screen showing "Snapshots" section of EC2 service:
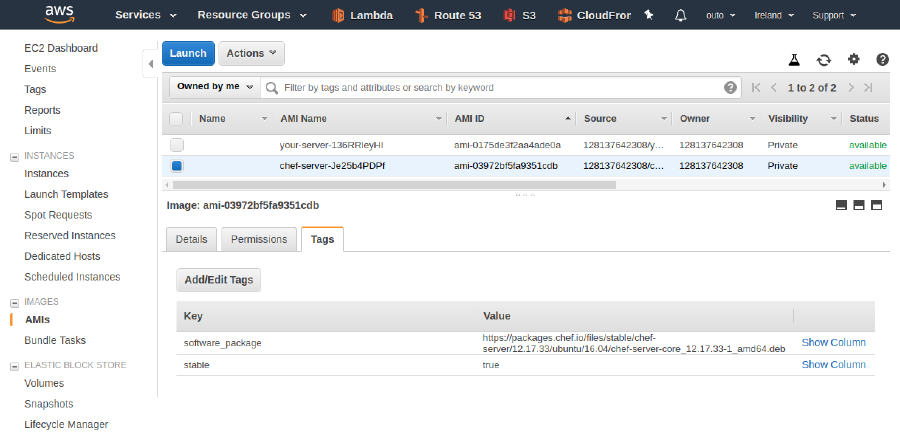
AMIs section depicted by an image further down this page.
Please note: in order to see your AMIs/Snapshots you can filter down the list by clicking the dropdown "Public images/snapshots" and selecting "Owned by me". If you see a long list of generic items you don't recognise, set that filter. Also note that the AMIs are regional so set the region in web console to be the same as you've used for creating you AMIs.
Prerequisites
- Linux OS to run terraform (shell scripts are used so Windows users would need to hack it about)
- Terraform (tested on client V0.10.5+)
- AWS CLI (tested on version aws-cli/1.14.60 Python/2.7.15rc1 Linux/4.15.0-36-generic botocore/1.9.13)
First time setup
1git clone git@bitbucket.org:outo/aws-ami-snapshotter.git
2cd aws-ami-snapshotter
3terraform init
Select base AMI
This example uses Ubuntu 16.04/x86_64 base image but you can pick different by changing filter queries in 'base_ami.tf'
 1data "aws_ami" "base_os" {
 2  most_recent = true
 3
 4  filter {
 5    name = "name"
 6    values = ["ubuntu/images/*/ubuntu-xenial-16.04-*-server-*"]
 7  }
 8
 9  filter {
10    name = "architecture"
11    values = ["x86_64"]
12  }
13
14  filter {
15    name = "virtualization-type"
16    values = ["hvm"]
17  }
18}
Replace the installation script
Provide an installation script in directory './templates/install.sh'.
The included example in this repo demonstrates installation of Chef server. It downloads Chef's binary package, installs it and its extensions.
In principle, the steps are as shown below:
1#!/usr/bin/env bash
2
3echo "${package_download_url}" > package.txt
4wget ${package_download_url} -O "package.deb"
5
6sudo dpkg -i ./package.deb
7rm package.deb
8echo "installed"
Package url is described by environment variable package_download_url, set from Terraform's variable software_package_download_url.
That same variable will become a tag 'software_package' on the AMI.
Create an AMI with pre-installed software
Before we create the new AMI, ensure that the Terraform's variable snapshot_ami_name_prefix is reflecting what the AMI
contains. This wil become the name of the AMI (after random string is appended to it).
The image above shows that very name in "AMI Name" column.
 1# (optional) to see what resources will be created
 2terraform plan
 3
 4# to apply with automatic approval
 5terraform apply -auto-approve
 6
 7# (optional) to inspect the state of the EC2 you can SSH into it (as normal), or use this script
 8./scripts/ssh_into_instance.sh
 9
10# if the instance seems configured correctly then consider marking this AMI as stable, if applicable
11# (more about this under "Is the AMI stable or not?" heading)
12
13# destroy can be run immediately after apply
14# (it won't delete the AMI or associated snapshot though, read the "Warning about costs" heading)
15terraform destroy -auto-approve
The job of this project is done now. Time to consume the AMI.
Use new AMI elsewhere
Now you've created the AMI you can start using it to spin up instances. In your projects use something similar to this:
 1variable "your_ami_name_prefix" {
 2  // because the AMI's name starts with the value of variable 'snapshot_ami_name_prefix'
 3  default = "chef-server"
 4}
 5
 6data "aws_caller_identity" "current" {}
 7
 8data "aws_ami" "your_ami" {
 9  most_recent = true
10  owners = [
11    "${data.aws_caller_identity.current.account_id}"]
12
13  filter {
14    // in order for an AMI to be found it has to be tagged as stable
15    // (done either by 'snapshot_stable_default_tag_value' or manually!)
16    name = "tag:stable"
17    values = [
18      "true"]
19  }
20
21  filter {
22    name = "state"
23    values = [
24      "available"]
25  }
26
27  filter {
28    name = "name"
29    values = [
30      "${var.your_ami_name_prefix}-*"]
31  }
32}
33
34resource "aws_instance" "your_server" {
35  ami = "${data.aws_ami.your_ami.image_id}"
36
37  //... rest of the config ...
38}
Is the AMI stable or not?
Notice in the previous example, the AMI filtering on the value of custom tag 'stable'.
So, when the AMI is first created it may not be good for anything at all. The software package may not exist under given url or install script could be incorrect. If that was the case the 'data.aws_ami' would just pick this broken (the latest AMI) and none of your EC2 instances would work. The filtering by 'stable' tag allows to stage the new AMI until you manually verify its quality.
Please note: This tag is currently set to mark images as "stable" by default.
For serious usage change the [default] value of Terraform's variable snapshot_stable_default_tag_value to false.
Ensure the instance used for AMI snapshot works as intended by SSHing to it and only then visiting the web console or
using AWS CLI to set 'stable' tag.

